Wednesday, December 11, 2013

DIY Silicone lights

When Zach and I first started living together we got a hand me down Christmas tree.  That first year, we didn't have any ornaments so I tucked all the Christmas cards we received in it and we loved it.  After the holidays that year I bought a crap ton (technical term) of ornaments for 90% off!  They were all golds, rich reds, and purples.  The following year we purchased lights for the tree.  What I didn't realize then, was that the new LED lights that were clear are actually 'cool white,' which shines a sort of silvery blue.  I was thankful to have lights on our tree, but I've always hated that they aren't the same golden yellow of the old fashion lights that I love, and that would match my gold ornaments much better.

SOOO......

I'm exploring ways to change the color myself, since buying a new set would run me around $50 for the whole tree.  Today I tried tinted silicone:

Looks good, right?  Not perfect, sure; but they look like candle flames.  Actually, these would make GREAT bulbs to simulate candles.  Well, back to today's business.

Here's what you'll need:

DO use 100% silicone
DO protect your skin with rubber globes
DO this project in an extremely well ventilated area
DO practice a lot before the real deal
DO NOT get the silicone or mineral spirits on your hands, it can burn
DO NOT make too much at once; it'll cure before you can use it

Mix a batch of the paints you chose to use.  If you plan to use the color paint straight from the jar, skip this step. 
 
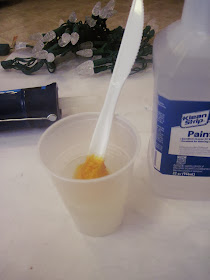
Squirt your silicone into the cup, you want to make sure it's deep enough to cover the entire bulb, but don't make too much at once.  Add a dollop of your paint.  You can choose to thin it out a little bit with the mineral spirits if you wish, though you don't have to.

Mix, mix, mix, until you get a gloopy, evenly colored glob.  It helps to cut the top of the cup off at this point so it's easier to dip your bulbs.  Work fast now, because it will start to cure in as little as 5 minutes (which is why you don't want to make a huge batch of this stuff.

Dip your bulbs in the silicone until it touches the plastic at the top.  If you don't dip it in all the way it'll have a hard time adhering to the bulb and you'll find a lot of it just slips right off.  After the bulb is covered, slowly pull it out to create the nice little tail.  If you've thinned it out, you should have something like above.  It's covered in a very thin layer with a short tail.  If you want a thicker layer with a longer tail, leave the silicone full thickness and pull the bulb out VERY slowly.

 
Take your time with this.  It's not hard to do, but it takes time to learn the best technique to achieve the look you desire.  If you don't like the way it's looking, wipe it off with a rag soaked in mineral spirits before it cures and you can try again, no harm done. 
This is so much fun, and I can see the applications year round!  Can you just imagine the Halloween lights?!  Oh, I'm daydreaming again.
 
Happy Holidays,
Nicole


Saturday, December 7, 2013

"Gingerbread" trees

I love doing crafts with my kids, and holiday crafts are no exception.  The problem with Christmas crafts?  They're all so messy and time consuming!  Maybe they're meant to be done while everyone is on Christmas holiday from school and work, but in my house, there still doesn't seem to be enough time. 

Growing up, I always LOVED making gingerbread houses out of graham crackers and royal icing, but even the thought of doing that with my three kids is daunting.  So instead, we're making "gingerbread" Christmas trees:


These are so much fun, and can be as long or short a project as you'd like.  It's simply a waffle ice cream cone, turned on it's head, frosted with green icing, and decorated with anything you'd like!  Including a zebra, and zebra droppings... My family has a twisted sense of humor, but that's how we like it.

My 5 year old had the patience to fully frost hers and thoroughly decorate, but my 3 year old just globbed some icing on, a few m&m's and started eating.  Oh well.  I wasn't at all disappointed because I hadn't invested hours into the prep the way my mother used to when my sister and I were younger.  (I appreciate it mom, but I just don't have the patience for it myself).

I hope you make some of these, and come up with some GREAT 'ornaments' to put on your tree.  Send me some pictures of your edible holiday creations, I'd love to see them, and even share them here on my blog!

Have a sweet night,
Nicole

Wednesday, November 20, 2013

doodle shoes

So my daughter wanted some shoes that were "not boring," but all we could agree on in the store were glittered or sequined.  While I know they're beautiful and tempting to buy, they're expensive and don't wear well.  Since Quinn is very active, I knew we needed something that would last better. So I took this old, well worn pair of $5 sneakers that she wouldn't wear anymore, and made something she wanted to wear:


Obviously, they aren't perfect.  But I saved them from the landfill and gave them at least a few more months of life.  These are nothing more than freehand doodling with a paint pen.  Because these shoes were canvas, the paint soaked into them well and didn't rub off for anything.  I didn't use any coating on them or anything, though I'd imagine you could use a waterproof canvas coating to give them a really long lifespan. 

[update: She outgrew these shoes before the doodling wore off.  She wore these shoes for months and the doodling only wore off slightly on the toe where she drags her shoe when she walks.]

Happy Doodling,
Nicole

Friday, November 8, 2013

We Made it Official

Yes, Zach and I are officially married.  Well, we had the wedding, anyway; I guess it's not official until our paperwork has gone through, but that shouldn't be too long.

I just wanted to tell you how wonderful it was to have such a small ceremony!  Not to judge those who have the big elaborate events, those I'm sure are great too.  But it was so much fun to be able to really visit with everyone, not just say hi and keep walking.  And because we only had about 20 people, we were able to go all out! 
If you're in Ohio there are a few things I cannot recommend enough: Sortino's Ristorante, and Lauren Tiura Photography!

First: Sortino's.  we had a little trouble with our menu, but considering we had started with two, and from there picked just the one, I won't entirely blame them for this, we did make it a little confusing.  So if you're having a party there, just be sure to confirm, a couple times, in writing.  The thing that they really REALLY have going for them is that they truly cater to your needs.  They took care of us, and I mean they REALLY TOOK CARE OF US!  We had a bartender and a server all night, refilling drinks, clearing plates, silverware, and empties, and bringing rounds of shots.  Basically, if we asked for it, they made it happen!  We were in the basement, which sounds dark and nasty, but it's actually so cool.  They have a little bar set up down their (nothing compared to the full bar upstairs) plus a couple of leather sofas, the "godfather table" which has the godfathers head as a centerpiece (which you can remove), and several other tables for guests.  The whole thing has a sort of Italian graffiti vibe, and you are even given chalk to mark up the walls, ceilings, and painted pipes.  And even though our menu got a little confused, the food was great: Do try the meatballs!

Second: Lauren Tiura Photography Disclaimer: I went to high school with Lauren, but this in no way affects my judgment of her photography skills. Lauren has done some photo's of my kids in the past and I've always been blown away by her ability to capture a moment so clearly that you can physically feel what it was like. 

http://laurentiura.com/

Just look at the photo of Quinn and tell me you can't feel it. 

http://laurentiura.com/
 
And yet again, talk about perfect.  Ok, ok.... that one is just because I wanted to show off my kids and I'm extremely biased.

http://laurentiura.com/
Here is a sneak peak.  This is just a natural shot, certainly not posed, but it was a very important moment in my family.  That necklace my mother is putting on me belonged to my great grandmother and was given to her (I think) in 1938.  Every bride in our family has worn that necklace since.  I'm really looking forward to this weekend when I should be getting some of the photos we took in this adorable little garden next door! 

Anyway.  If you're getting married, talk to Sortino's, even if you do go the 'big event' route, they'd sure have a heck of a rehearsal dinner!  And get Lauren to take your photo's, she won't disappoint - I promise!

Love & Joy,
~Nicole

Saturday, October 19, 2013

Oh, I Didn't Mention It?

So, as much as I love Halloween, it's been put on the back burner this year.  Don't worry, it's for a great reason, that I haven't mentioned:  I'm getting married!  Yep.  It's nothing, just dinner with our immediate family (siblings and parents) and a civil marriage service.  I had no idea that even this extremely simple wedding would be so much work and so much stress!  There have been times I've wanted to ditch the whole thing and walk myself to the courthouse and get it over with!  Oh, and it's EXPENSIVE!  Holy crap is it expensive.  There's absolutely no way we could have ever thrown a full blown wedding.  When you realize that my mom's family alone is 22 aunts and uncles, 40-something cousins, and 20-something cousins kids and that's just ONE of the four very large families we'd be inviting.  Anyway, I'm on a rant.

So, here's the point.  I'm getting married.  I'm getting married, and I'm not throwing a big wedding.  I'm getting married, and I'm not throwing a big wedding, and it's still expensive and time consuming.

~Nicole

Monday, September 30, 2013

Painting Cheap Skulls

 So, we all know I truly love Halloween.  I don't know why, but I really do think about it all year long.  I also am truly cheap.  I hate spending any money on anything!  So, when I spotted some plastic skulls at the dollar store, I picked up two, with no real plan in mind.  Of course they were really cheap looking, solid beige, with no real definition. With a few colors of paint, and some paper towels, I created these:


 Unfortunately, I don't actually have a tutorial, but if there's any interest at all, I'd certainly make one!  In the meantime, I'll describe what I've done here.  I started by blacking out the eye sockets, nose, and jaw area with some black craft paint.  Then I painted the teeth white so they'd have a little bit more contrast (I'm not sure if this step was necessary).  Next I 'aged' the whole thing by applying dark brown craft paint all over the skull and wiping the paint off the raised surfaces with a  paper towel;  this is a very typical patina method.

 At this point, they looked much better and I could have easily stopped there, but I wanted to add some more interest to them:


 I continued to age the skull with some more dark brown and even a little black.  I then used some dark red and black craft paint to make some bloody areas around the eyes and a couple of wound marks.  I used both a wet and dry paper towel to blot them out a bit making them look a little streaked and clotted.  I used some of the blood in the teeth area too which added a great depth to them.


 The last step is to use a very fine brush to make the 'fractures' in the skull with some black craft paint.  Just make some jagged lines that get thinner as they spread out.  I tried to make the skull on the right here look like it'd been smashed with a hammer. and the one on the left like it'd been stabbed with a kitchen knife or maybe chopped with a machete?


 As you can see here, they don't need to be perfect up close, because no one is likely to be studying them this closely.  Use your imagination here, there's so many possibilities!  If you scroll back up to the very first picture you can see there where I used this technique to make the eye socket look a little broken.

Happy Painting,~Nicole

Thursday, September 12, 2013

2 Ingredient, Microwave Fudge

Yes, this delicious fudge is made in the microwave with only two ingredients!

Okay, so I have to give props to my mom for this recipe.  I was visiting a little while back and she made this microwave fudge that was so delicious I just had to ask for the recipe.  And she promptly laughed at me.  That's because the recipe said "heat tub of frosting and bag of morsels in microwave safe bowl."  Yep:


Yes, you mix these two ingredients together in a microwave safe bowl, nuke for a minute or so, mix, nuke, mix, continue until smooth.  Then you pour them into a pan to cool.  To make things easier you can grease the pan, or better yet, line it with parchment paper.  Let it cool in the fridge until it's nice and firm (a few hours), then serve it up!

And the absolute best part?  You can pretty much use any flavor tub of frosting and any flavor morsels!

For a traditional fudge flavor use chocolate frosting and milk chocolate morsels.  For a super dark chocolate fudge you can try dark chocolate frosting and dark chocolate morsels.  You can also experiment with white chocolate chips, peanut butter chips, etc.

I'm going to try using Ande's mints instead of morsels!  Or maybe make a vanilla fudge and crumble some Oreo's in there.  Oh, this is dangerous.

Happy Fudge Making,
Nicole


Thursday, August 22, 2013

First Day of Kindergarten

Oh yes, she's getting big!

Sat on our bench to pose for a picture before walking to the bus stop.


She didn't even think to say good bye, but she sure was saying hello.

After hollering to get her attention, she barely waved, then ran to her seat.
 

Her first day went relatively well.  The only things she remembered well enough to talk to me about was lunch and recess.  Go figure.  I did get that call that every parent dreads, Quinn had wet her pants at recess.  I had done so well keeping my tears in check all day, but this call sent me into full blown alligator tears.  I felt like I failed her. 
 
Lets hope day two goes as well or better than day one!
~Nicole
 

Wednesday, August 21, 2013

How to NOT Can Tomatoes

I had planned to write a highly motivational piece on how easy it is to can tomatoes.  That didn't happen.  While visiting my grandparents over the weekend I got bushels and bushels of tomatoes. Enough to cover a large portion of my counter 2 or 3 deep:


I used the same method for skinning and dicing/crushing the tomatoes as in my post, here, about freezing tomatoes.  I was very slow at first, but managed to get pretty good at it by the end.

Then I followed the directions that every blog on canning will tell you:
~Start a canning pot boiling
~Sanitize your jars, lids, etc.
~Heat your tomatoes and liquid (juice or plain water)
~Pack tomatoes into jars, pushing down with handle of wooden spoon
~Add acidity (I used lemon juice)
~Add liquid and use spoon again to release air bubbles
~Wipe jar and apply seal and ring
~Put in boiling canning pot..... This is where things went awry

The very first jar I put in broke immediately.  It must have taken me too long to fill the jars and this one cooled because it cracked the second I put it in the boiling water.  So I put the rest in, with no breaking, but the kept tipping over... Probably because my electric burner is a bit smaller than the canning pot so it sort of leaned a bit.  Once I got them all in though, they seemed to stand okay without knocking into each other.  Although I think that two of them did knock at some point, because when I checked on them later there were tomatoes floating around the entire pot and a clearly broken jar just floating around... Yay.

The others seemed to work okay, and sealed quite well.  Of course now I'm extremely worried that I did something horribly wrong and they'll all spoil before we get to use them.  What a terrible waste that would be.

And I'm sorry to disappoint if you were hoping for the horribly photographic evidence; I was far too distraught to think about anything other than all the hard work I'd put into peeling and dicing the tomatoes just to throw them down the drain *sigh*

Have you had a bad experience with canning?  Do you know what I did wrong?  Do you just want to laugh at me?
~Nicole

Friday, August 16, 2013

Please, Meijer, tell me it isn't so!

Dear Meijer,
 If you know me, then you know I'm a pretty big coupon clipper.  I'm no extremist like you see on tv, but I do love a good coupon, especially a doubled one!  That's why I loved Meijer.  They doubled coupons up to $1 which was always so helpful in keeping grocery costs down.  I just learned the other day that Starting on 8/25/13 they are going to stop doubling any and all coupons.  BUMMER!  They say they're going to be working on their mPerks program (which if you don't have, you should get) but that hardly makes up for a good doubled coupon in my opinion.  We'll see how much they improve it.

I do have to admit though, that this month hasn't been too bad as far as mPerks go.  So far, I've got a free gallon of milk, free peanut butter, a dozen free eggs, and $5 off any $25 purchase.  I don't know if they can keep it up like this, but it's the only way I can see myself continuing to frequent their stores.  Sorry, Meijer.

Your once-upon-a-time very loyal customer,
~Nicole

Tuesday, August 13, 2013

Freezer "Crushed" Tomatoes

These were extremely easy.  Seriously.  And freezing them means that I don't have to mess with canning, because honestly, it kind of scares me.  The plus side is that (as I have done here) you can do this in small batches as you gather a few extra tomatoes from your garden, or in my case, your grandparent's garden ;) 

Though it's very easy, getting the skin off is the most time consuming part.  Here's the trick though.
Start by making a small "X" or simply poking a knife in the bottom of your tomatoes.
 
Dunk them into a large pot of boiling water, just a few at a time.  Within a minute the skin should split from where you broke the skin. 

When skin breaks, remove them from boiling water immediately and submerge them in ice water to draw the skin back even farther.
 
Gently peel back the skins, cut out the stems, and squeeze or scoop our seeds and juice.  As you can imagine, this is an extremely messy task.  That's why I recommend doing this part over a colander in the sink to catch anything that slips out of your hands.

Use your hands or a knife to crush or cut the tomato flesh into small pieces in the colander.  This helps to eliminate some excess juice.

Then scoop your tomatoes into a baggie and label and date them.  Easy as pie.  Another trick is to lie them out flat like this in your freezer.  They'll stack better and thaw quicker.

(**Update: Check out my related post on How NOT to Can Tomatoes**)

Enjoy the flavor of sun ripened tomatoes all year round.
~Nicole

Saturday, August 10, 2013

Tonto and The Lone Ranger

I've finally decided on (some) of the costumes for the family.  Hooray.  I'm going to be Tonto, and Ronan will be The Lone Ranger!  I'm going to follow Johnny Depp's 2013 version relatively closely, albeit a female version.  I threw together a 5 minute sketch to visualize what I'm thinking:
Since Depp played Tonto bare-chested, I needed some coverage.  I have a brown overbust corset that has beautiful stripes I think would suit this costume well.  I'll need to make or find some sort of beaded chest piece like Depp wore in the movie to help a bit with the coverage also.  I'm not sure if I'll try to wear some sort of shirt or not, I suppose it will depend on the weather; last year was so miserably cold I almost wish I hadn't gone out at all!  Keep your fingers crossed for some warmer weather.

Oops, got off topic.  Back to it:  I'll need some feathers and beads and such for my hair, bandanna, bracelets, and belts.  I'm not sure if I want to stick with the pants (like Depp's character wore) or go with a skirt?  I think some nice flouncy fringed pants would look great with a pair of knee high, fringed, red moccasins. 

My cousin, Amanda, of Amazing Moments, does unbelievably amazing face and body painting, so I'm relying on her to give me a hand with the face paint, and some of the tattooing/war paint.  Right Amanda? ............Right?

Oh... and I need to find a dead bird.  wtf.

Saturday, August 3, 2013

Halloween? Already? Yes.

Call me crazy, but I'm getting started on Halloween costumes already!  Since I always make our costumes, and generally get most of my supplies through thrift stores or garage sales, I have to start early.  It doesn't help that I have at least 4 costumes to put together!  I have always liked to do group costumes, but the kids are getting old enough now that they are starting to ask to be certain things/characters. 

Last year we didn't do anything that matched, but I got to have some fun with Ronan:
Yea, I'm pretty messed up.  ;)

We also made this great spider egg sac that's been so popular on pinterest:


It's easy enough the kids can do it.  You just stuff an old sock or something inside a pair of old white tights, then hot glue some spiders inside and out.  Done.

Last year wasn't my most creative year, so I'm going to throw in some older pictures, just because I can.
Here I am in 2009 with Quinn and my sister

And here's the old man, and the family tree.
And here we are in 2010
The really funny thing about this one to me is that my sister and I had planned to be the Mad Hatter, Queen of Hearts, with Quinn as Alice.  Then we realized we had no out fit for her (then) new boyfriend, Ty, so we figured he'd just be the Knave of Hearts.  We didn't realize that a nave was basically a slave or servant.  oops.

That year all our costumes were completely from scratch, I even made Quinn's dress (without a pattern, ouch), and my awesomely over-sized top hat.

Do you have any awesome ideas for group costumes?
~Nicole


Tuesday, June 25, 2013

Kindergarten Ready!

If you read this post about carseat safety, you'll know my oldest will be starting school this fall.  Just like every parent who's ever crossed this bridge, I'm asking myself 'where has all that time gone?'  I'm so not ready for this yet!  But she is.  So it's my job to make sure she's ready in more than just willingness.  So, we've been practicing our upper case and lower case letters, letter sounds, counting, and simple math.  I try to make it fun for us.  Usually this involves a craft!

So, here's what we've come up with so far to have fun practicing for kindergarten (without spending any money):

 
I just cut out some t-shirt shapes with dots on them.  I purposely didn't align the dots so she wouldn't 'memorize' the pattern of the dots quite so easily.  She clipped the clothespin with the corresponding number.  Great start, but it only lasted a few days before she was beyond this.

 
So we moved to some simple math.  The same set of clothespins with numbers, I just made a two sided card.  This side had a "+" and "=" while the other side had "-" and "=" on it.  She could clip them on, add them up, then clip the solution.  The cool thing about this is that even though she hasn't grasped subtraction yet, when you turn the card over the clothespins that say "4+1=5" on this side will say "5-1=4" on the reverse.  So when she gets to subtraction she'll be able to see the two working together.


And this shape puzzle game was something the kids got for Christmas from grandma.  They love this game.  I always try to do something a little different, asking "what shape is the yellow?" "How many triangles are there?" or "what color is the square?" etc.  The greatest part for me is that she doesn't even realize it's educational!  It just fun for her, so she wants to learn. 
 
And now, we're working on a letter matching game.  Letting her help me make all the pieces and get it ready really gets her invested in the game and the learning.  I hope to have it finished soon and get some pictures of it up here.
 
Have a good week.
~Nicole


Monday, June 24, 2013

Mason Jar Blender Totally Works!

A while back I did this post about freezing your leftover coffee in ice cube trays.  This is something I've been doing for years, since I was in college and ultra poor and couldn't afford those fancy iced and frozen coffee drinks from the local cafĂ©.  Recently I've been doing this for my iced coffee and I love it, but as it's heating up I sometimes want an afternoon treat that's a little bit more indulgent (and frozen).  But getting out the blender and messing up the whole big thing for one small glass of frozen coffee was just too much for me. 

And then:  Pinterest!

I came across a pin from realsimple.com that said you could attach most mason jars directly onto the blades from your regular old blender.  Yea right, I thought.  Well, I'm here to tell you:


IT WORKED!

So I made myself a frozen coffee and drank half before I thought that I might want to share this information.  And of course I'd already put the blade in the sink so I had to wash it and reattach it to my mason jar.  You guys are really lucky I love you because I never would have drug myself away from this treat if I didn't.


And I don't exactly have a recipe, but let's face it, even if I did have a recipe for you, most people wouldn't follow it anyway, or you'd only really use it as a guide.  So here's what I threw in mine today:

6 or 8 frozen coffee cubes
1 large scoop of caramel ice cream
a healthy splash of milk, maybe 1/3 or 1/2 cup?

Of course you don't need the ice cream, but I really wanted a treat today! 
Let me know what variations you like,
~Nicole

Tuesday, June 11, 2013

DIY belts

I've had my sewing machine out quite a lot lately, mostly just fixing things that don't quite work for our family any more, but it's sure got the creative juices flowing.  One of the things I don't have, that I'd really love to, is a few nice waist belts.  I guess I've never bought any because they seem so expensive and usually I spend the little bit of money I do have on shoes (lol). So, I've found a few examples that you could make yourself and they look quite nice.

Wide obi belts:


Obi Belts
Left: SoCo Vintage, Center: Eloquii, Right: Mimi G Style

While the left and center belts sell for $20 and $35 respectively, you can make your own Mimi G Obi Belt. She has a printable pattern, and tutorial video that is very easy to follow. If you can sew a straight line, you can sew this belt.

leather:

So, Katie Startzman, over at Duo Fiberworks made this fun little number. While I have no leather working skills, she says its quick and easy to cut, plus you don't need any hardware to wear it. How cool is that?

double buckle:
In her original post, Rachel says this belt is kind of hard, then revises to say she was just frustrated with it, plus she's got it all figured out for us. I'll give it a try too, and let you know my opinion. Either way, it's really cute with lots of possibilities. Her tutorial, here, is very detailed with templates and in progress photos.


And of course, I'm a sucker for a nice thick, almost corset like belt:
Tutorial here. Scroll down for the instructions. This one looks a little more difficult, but perhaps more sturdy.  Maybe I'll give this one a try this week?  We'll see.

Much love all,
~Nicole

Saturday, June 8, 2013

Ultimate Taco Seasoning

We love Love LOVE tacos in my house, but the taco seasoning you buy in packets in the grocery store is so darn expensive in the long haul, and is full of extra ingredients like corn flour and colorants.  This is why I've developed my own recipe!


There's ton's of recipes out there, and they're all different, coming in different portion sizes, with different ingredients, and different spice ratios.  I've tried to use and compare as many mixes as I could before deciding what worked best for me.  Plus, I've come up with a recipe for both a bulk and individual size!  How nice of me :-D

So, without further ado, I've included teaspoon measurements if you'd like to halve the recipe:

bulk recipe taco seasoning:
1/3 C. (16 tsp.) Chili Powder
 1/4 C. (12 tsp.) Paprika
3.5 T. (10 tsp.) Cumin
3 T. (9 tsp.) Onion Powder
 2 T. (6 tsp.) Garlic Powder
2T (6 tsp.) dried oregano
2T (6 tsp.) dried cilantro
1T (3 tsp.) Salt
Use 2 T. per 1lb. ground beef, plus or minus to taste, plus 1/2 cup water.  Simmer 3-4 minutes to distribute flavors.
Mix all ingredients thoroughly and store in your preferred, air-tight method.  My favorite storage right now is mason jars with shaker lids scavenged from old Parmesan bottles!  And maybe someday I'll even get around to giving them pretty labels.  But for now, white stickers and black sharpie will just have to do:


Also, I've tried smoked salt and/or smoked paprika and both are delicious!  I especially like these flavors on chicken and pork tacos.  You could also add crushed red pepper or cayenne pepper for a spicier variety.  Just start with small amounts, you can always add more if necessary. 

For a single serving, this isn't exactly the same spice ratio, but it's darn close!


single serve taco seasoning:
1.5 tsp. chili powder
1.25 tsp. paprika
1 tsp. cumin
1 tsp. onion powder
.5 tsp garlic powder
.5 tsp oregano
.5 tsp cilantro
.25 tsp. salt

mix all ingredients in small bowl and sprinkle over 1 lb. ground beef, adding 1/2 cup water.  Simmer 3-4 minutes and enjoy.


 Enjoy!
~Nicole

Thursday, June 6, 2013

Dried Candied Mango Slices

In my previous post, I showed you how to perfectly cut your mango slices.  Now you're ready to begin prepping them for drying. All you need is a decent thermometer and a dehydrator. This is the one I've used for over 5 years and it's never let me down! If you're buying one from amazon, please consider using my link above or at the bottom of the post. I'll get a tiny kickback for sending you to them, even if you purchase a different product than I linked to. I would greatly appreciate the click.

For simple dried mango slices, spritz with lemon or orange juice (to prevent oxidization which turns the fruit brown) and place in a dehydrator at 130 degrees F anywhere from 6-16 hours depending on the thickness of your slices and relative humidity.

If, at this point you'd like to add a bit of sweetness to your mangoes make a simply syrup in a large pan by combining 6 parts warm water to 1 part granulated sugar (I used 6 cups of water and 1 cup of sugar).


Place your mango slices in the sugar water and slowly bring to 190-200 degrees F on medium/medium-low heat.  DO NOT BOIL the water.  As soon as it reaches temperature, remove the pan from the heat and cover it.  Allow the mangoes to soak overnight, or at least 6 or 8 hours in the water.

Remove the mangoes from the liquid and allow to dry for a few minutes in a colander.  You can save the liquid, which will have quite a bit of mango pulp in it to use for fruit leathers.  Layer your mangoes evenly on dehydrator rack, making sure they don't overlap.  They can be nearly touching, because they will almost immediately shrink allowing good air flow around all pieces.


Follow the instructions of your dehydrator, but depending on the thickness, quantity, relative humidity, and effectiveness of your dehydrator, it could take anywhere from 6-16 hours at 130 degrees.  If you'd like, you can set the temperature 10-15 degrees higher for the first hour because the rapid evaporation of water will keep the fruit 10-15 degrees below ambient temperature at first.  Be careful though, because if you forget to turn it down, you'll end up with pieces that are overly dry on the outside but are still too moist in the center.

Whatever you choose to do, begin checking them before you expect them to be done.  I expected mine to be ready after about 8-10 hours, but after about 6 hours, I checked mine, and they were done.  Some of the smaller pieces may be a bit hard or crispy and even the thin edges of the larger pieces will be a bit over dry.  The centers should still have a bit of moisture.  They'll feel a bit like sticky leather; soft and pliable.


At this point, place all the mangoes in a plastic bag for 12-24 hours.  This allows the moisture to re-distribute between the pieces and  those once crispy pieces will soften and the centers of your thicker slices will dry out a bit more.  After this you can transfer them to your preferred storage container (glass works best), or you can candy them.  This time around I sprinkled powdered sugar right in the plastic bag and shook them around until all the pieces were thoroughly coated.  I've also had success with granulated sugar or raw sugar.  Whatever you choose will be determined by your personal preferences.


Again, once the pieces are coated, they'll store best in an air-tight glass jar.  For long term storage, you can keep them in the fridge about six months or freezer 9 months to a year.

I hope this satisfies your sweet tooth, and enjoy!
~Nicole